I think is the first thing I saw on pinterest that really made me go "oooh I wanna do that!" So even though melted crayon art has been done to death I just had to have a go myself! And it was oh so very much fun. Turns out that melting crayons is even more fun than melting plastic! :)
Things you'll need:
Want another idea for what to do with your broken crayons? Check this post out.
Things I've learnt:
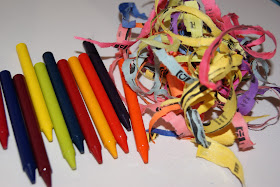
- For some reason Crayola put way less glue on yellow and orange crayon wrappers so they come off much quicker than all the others when you soak them. Go figure!
- Melting stuff is fun!! I feel a bit like Phoebe from Friend's brother Frank, remember that one? :)
- If I was doing this again I'd definitely be a bit more patient and start at one side and not move on until I was happy with how much it had melted. For this one I kinda just wanted to get melting so I kept going back and forth over the whole line of crayons and well the drippy effect isn't as cool cos of this. (It's still pretty cool though!)
- Oh and when I opened one of the boxes of crayons a lot of the nibs were broken off so I just stuck them on without them thinking it wouldn't matter. It kinda does. The wax melts off the nibs and drips down so when there's no nib it kinda goes to the nearest nib to the right or left instead which doesn't give as nice clean lines of drips. It still works, I just think it'd be easier and look nicer if they all had nibs! And you could just glue them on.
- I wish I hadn't used the white crayons, they kinda ruin the rainbow I think.
- Oh and if I'm doing this again I'll cut the crayons in half before I glue them on, you really don't need whole crayons.
- Hey I had some actual advice in my things I've learnt section today! Go me. :)
Things you'll need:
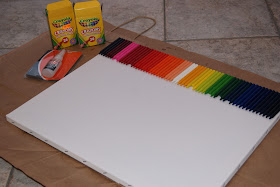
- A few boxes of crayons (I used 3 x 24). Crayola melt much better than cheaper brands.
- A canvas. (whatever size you like, I got lucky and picked mine up for €2)
- Some tracing paper/baking parchment
- Some black paint
- A page with the words you want printed on it
- Some super glue/ a glue gun
- A hair dryer
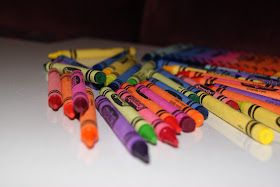
Grab a bunch of crayons.
Spend forever peeling off the wrappers.
Realise that it'd be so much easier to just throw the crayons in a basin of water....
... and wait for the wrappers to come off themselves!
Line up all your crayons at the top of the canvas and super glue them in place. Try not to get super glue all over your fingers. :(
Print out a word onto plain paper. Place a piece of baking parchment over the word. Trace over it in pencil and then flip the parchment over and trace over the letters again (so that you're not transferring backwards letters). Place the piece of parchment down on your canvas and trace over the letters once more.
Paint in your letters with black paint. You probably should use fancy acrylic paint and expensive paint brushes and not poster paint and an old make up brush... :)
Prop your canvas against a chair with a big piece of paper (or an open paper bag) behind it. Lay out lots of newspaper on the ground underneath and around it. Plug in your hair dryer and get melting!
Experiment with the different settings. I found that a high heat but low power worked the best. Too much power and the wax went everywhere! Start at one side and work your way along to the other, aiming your hair dryer towards the bottom half of your crayons at first. Keep going til you get the look you're after!
Sit back and admire your masterpiece! Love it. :)
Want another idea for what to do with your broken crayons? Check this post out.
Things I've learnt:
- For some reason Crayola put way less glue on yellow and orange crayon wrappers so they come off much quicker than all the others when you soak them. Go figure!
- Melting stuff is fun!! I feel a bit like Phoebe from Friend's brother Frank, remember that one? :)
- If I was doing this again I'd definitely be a bit more patient and start at one side and not move on until I was happy with how much it had melted. For this one I kinda just wanted to get melting so I kept going back and forth over the whole line of crayons and well the drippy effect isn't as cool cos of this. (It's still pretty cool though!)
- Oh and when I opened one of the boxes of crayons a lot of the nibs were broken off so I just stuck them on without them thinking it wouldn't matter. It kinda does. The wax melts off the nibs and drips down so when there's no nib it kinda goes to the nearest nib to the right or left instead which doesn't give as nice clean lines of drips. It still works, I just think it'd be easier and look nicer if they all had nibs! And you could just glue them on.
- I wish I hadn't used the white crayons, they kinda ruin the rainbow I think.
- Oh and if I'm doing this again I'll cut the crayons in half before I glue them on, you really don't need whole crayons.
- Hey I had some actual advice in my things I've learnt section today! Go me. :)


Yes, it's been done to death but it's so much fun. Love your results!
ReplyDeleteThanks! Definitely so much fun, I think I see a lot more crayon melting in my future. :) Thanks for visiting!
ReplyDelete