Tuesday, 27 November 2012

Fabric Tangrams

Fabric Tangram House - Free Template


I know I promised this post on making fabric tangrams on Saturday but I ran into a little problem! I had it all set to go and was just uploading the photos when Blogger informed me that I'd run out of photo space!!! It seems that my plan of lazily uploading giant pictures without re-sizing them had finally caught up on me. Newbie bloggers take note - re-size!!

But after a bit of searching I've discovered a few work arounds. Firstly I connected my blog email address to the blog and set it as a contributor which means if I log in through it I can still upload photos. Basically that email address has its own photo storage allowance. But it's a bit of a pain so the other thing I discovered is that as long as you keep your pictures smaller than 1026 pixels you can upload to your hearts content. So for now I'm okay again! And I suppose I'll start re-sizing some old pictures and replacing them and stop uploading giant pictures! Well after today. :)

Fabric Tangrams

Now back to the task at hand. On Friday I gave you my Friday Freebie - a tangram booklet and template. I'm a huge fan of tangrams but I started thinking how I could make them even more fun. The answer - make them out of fabric instead of card! :) I originally saw this pin of a "tangram-esque fabric puzzle" on pinterest from Beauty All Around. It's amazing, she made 42 little coloured fabric squares! There's no way I'd have the patience for that but I figured I could give a normal 7 piece tangram set a go.


Click here to download the templates I used. I made mine yellow on one side and red on the other but you could do them all  in different colours or just use one. I cut out the bigger template and traced around each piece twice, once on red fabric and once on yellow. I used the smaller template to cut out the wadding to stuff them.

Then pin the pieces right sides together and sew around the sides. Make sure to leave a gap so you can turn and stuff them. The trickiest part for me was sewing the corners on the triangular ones. 


Then turn the pieces the right way out and stuff them with your little pieces of wadding. Use a ladder stitch to neatly sew up the gaps and then you're all done!

                    Fabric Tangram House                      Fabric Tangram Cat
                           Fabric Tangram Swan


Then have some fun and see what pictures you can make! There's loads of ideas for puzzles on the internet but start with trying to recreate the square. :)

And of course do download my little booklet. It has 12 shadow puzzles in it with the solutions at the end. And it's free! I made a little bag to keep the pieces in and the booklet fits in perfectly too if you print multiple pages on one piece of paper.

I found this cute book that would go well with the tangrams too. It's kinda a take on the three little pigs with some tangram puzzles thrown in. :)


Things I've learnt:
- This really should be a thing I have not learnt, I still left too tiny a gap and had zero fun turning and stuffing some of my tangrams. Will I ever learn?
- But I did learn lots about re-sizing pictures and avoiding paying Google any money. ha ha Love you really Google.
- And I learnt that fabric tangrams are so much more fun to play with than card ones. I made these as a gift but might have to keep them and make another set!

Saturday, 24 November 2012

Friday Freebie #3 and a Huge Sale!!

Don't worry, I haven't forgotten about Freebie Friday!! I've just been working on finishing off this week's freebie to make sure it's absolutely perfect! :)

(Thanks to Michelle @ The 3amTeacher for the cute graphic) 
But before we get to that I've got some exciting news! I'm participating in my first TPT sale and it's a big one!! This Monday and Tuesday (26th and 27th) there will be 28% off everything in my store!! So have a look at some of the new things I've added, go put them on your wishlist and then head back over next Monday or Tuesday and grab a bargain! 

Here's a few of the things I've added this week:


Cute Christmas Clip Art - Penguins, Snowmen, Christmas Trees

If you like last week's freebie (Border Clipart) then do check out my Christmas clipart collection. There's cute penguins, snowmen, christmas trees, plum puddings and holly! Use them to add some fun to your worksheets, Christmas displays or TPT products. :)

Penguin themed upper and lower case letter matching activity

Sticking with the Christmas theme I used those little penguins to make this cute literacy pack. It contains upper and lower case letters on penguins for a fun letter matching activity. As well as these flashcards there's also penguin themed worksheets to practice letter identification, formation, matching and order. And did I mention how cute they are? :)

Positional Language pack for teaching ESL and Gaeilge

Gingerbread man Positional Language Pack. This pack come in two versions so make sure you get the one that's right for you! This one is great for young children and ESL/EAL learners who need to practice positional language. It contains flashcards, worksheets and activities to learn and practice using words like "under", "beside", "behind" etc. Children will love working out where the gingerbread man is hiding!

This pack also come in a version as Gaeilge. It can be hard to find cute resources for teaching Irish online and the ones that do exist are either very expensive or aren't very attractive. But don't worry, I'm working on solving this problem! One pack at a time. :) So if you're planning on covering positional language like "ar an", "os comhair" etc. in the next few weeks then this Christmas themed pack is perfect for you!

Free tangram booklet and templates!

And finally, this week's FREEBIE!! :) Fun with Tangrams - Click here to download! This pack contains tangram piece templates, ideas for use and a booklet with 12 puzzles and solutions. And it's free!! 

You can see in the picture that I used the template to create a fabric set of pieces. They are so much more fun to play with than paper or card ones. I made them as a gift but I'm already thinking I'll just have to make a second set and keep these for myself! Check back tomorrow and I'll show you how I made them.

Want more freebies? Check out Friday Freebie #1 and Friday Freebie #2!

Things I've Learnt:
- People love a good freebie. :) And hopefully they love a good sale too!


Thursday, 22 November 2012

Liebster Award and a Giveaway!


 I've been nominated not once but twice for the Liebster Award! :) Thanks T'onna @ Navy Wifey Peters and Shannon @ Sewing BarefootThe Liebster Award is given by bloggers to up and coming bloggers who have less than 200 followers. It is to show new bloggers that they are appreciated  and to help spread the word about new blogs. 

The rules:
- You must post 11 random things about yourself.
- Answer the questions that the nominator set for you.
- Create 11 questions for the people you nominate.
- Choose 11 blogs you love (with less than 200 followers) and link them in your post.
- No tag back (but please leave me a comment on this post with the URL to your Liebster post so I can learn more about you)!

11 Things About Me:
1. I've been purposefully being vague and not giving away too much about myself here but I guess it might be time to divulge a little more! :) So number 1 - my name is Karen.
2. I live in Ireland. Which is lovely most of the time but way too cold and wet at others! 
3. I originally started this blog to keep myself amused as I recovered from an illness. It definitely served that purpose and I'm pretty sure it's here to stay!
4. I am a primary school teacher and love my job. Although in magic land I'd be paid 3 times as much and people would actually appreciate what I do... :)
5. I keep telling myself I'm going to learn how to crochet but somehow manage to find a million other things that need to be done first. 
6. I am a world champion procrastinator. (See number 5.)
7. I am addicted to crisps (chips for you Americans) and would happily give up chocolate forever just so long as I could keep eating my crisps. mmmm
8. I used to live in Bangkok, Thailand and might hopefully be moving back there soon!
9. I am a terrible singer. Like hands over your ears, panes of glass breaking, I'd rather scrape my nails down a blackboard terrible. ha ha. Thankfully little kids don't mind too much and nobody else has to hear me sing!
10. I still haven't learnt how to drive. Another thing sitting pretty on my to do list.
11. I spent a month volunteering in an orphanage in Thailand and googled to see if any of the adoptive parents had blogs so I could follow along and see how the kids were doing. Thus began my adventures in blogging!

What is your favorite craft project you've created? Hmm that's a tough one. Probably my little hedgehog pin cushion. He looks cute (so much so that I included him in my header) and unlike most of the things I make I actually use him every day. :)

What's your favorite book? I love to read. But I tend to be a bit feast or famine about it! Haven't been reading too much lately as all my free time is going into this blog and my TPT store. But my all time favourite book is "We Need to Talk about Kevin" by Lionel Shriver. Or any of her books really.

Do you have any children?  If so, how many and what are their names & ages? Nope no kids!

What's your favorite season and why? I love Christmas but hate the cold and dark so I'm gonna go with summer. I'm all about the sunshine and beach time!

What are a few blogs that you read on a daily/weekly basis? Way too many! The 11 blogs I've nominated of course. And I'll give you a few others across the spectrum:
Thai Adoption Blogs (lots of Thai Adoption blogs)
- Creating my Way to SuccessThe DIY DreamerEarning My Cape (3 awesome crafty blogs)
Living Montessori Now4th Grade FrolicsClassroom Freebies (full of great teaching ideas)
Our Sonny Life (if you're going to read any read this one)


What is your favorite TV show? I love "How I Met Your Mother" and "The Big Bang Theory". I'd love to lock Sheldon and Barney in a room together and watch them drive each other crazy! ha ha

What project(s) are you currently working on? Too many! I have a tangram project that I should get finished and up on the blog in the next few days. And I'm making a princess superhero cape, a house warming gift and a few new TPT packs too. 
What is your favorite pin on Pinterest? Too many! My sewing inspiration board is probably my favorite board so I'm just picking something from it that I'd love to make but seeing as I have a very long surname I probably won't! - Pencil Banner

Are you a dog or cat person? Cat. Definitely cat. :) I like dogs, and will probably own one someday but they are a lot of work and too jumpy and dirty for my liking! Cats on the other hand are always clean and are independent enough to be able to cope on their own when I go away for the weekend. And you may have to work a bit more for their affection but that just makes you appreciate it more! 

Where do you buy most of your clothes? I'm a huge fan of H&M, Penneys, Forever 21 and Zara. Basically the only shops I can afford to buy stuff in at the moment!

How long have you been blogging? I started this blog last January, just to see how to do it. I put up a picture of a bag I'd made and then forgot all about it. Then this summer I found myself with too much time on my hands so I decided to turn it into a real blog! :)

Questions I'm Asking My Nominees:

1. Why did you start blogging?
2. I'm giving you a thousand euro - what are you going to do with it?

3. Do you like to travel? What's your dream holiday destination?
4. What achievement are you most proud of? Permission to brag!
5. If time wasn't an issue what new activity would you take up?
6. What's your favourite Christmas tradition?
7. Any blog recommendations?
8.What's your favourite pin on Pinterest?
9. A few easy ones to end with - chocolate or crisps/chips?
10. Cats or dogs?
11. Real books or ebooks?

Blogs I'm Nominating:
Ana Love Craft
The Purple Pumpkin Blog
Learning with Mrs. Leeby
Sew-Licious Home Decor
Sunny Stitching
Fall Fever
One Less Headache
Making Boys Men
Fifth in the Middle
Kinder Love
Ever Never Again

Don't forget to comment on here and leave me a link when you've answered!! :) It is a little time consuming but it's nice to get to know a bit more about the people behind the blogs!

I participated in my first giveaway this week! It's being hosted by Leah over at Learning for Keeps to celebrate her reaching a milestone 200 followers!! She has 4 different prizes to be won, each containing about 10 teaching resources made by teachers. There's some great stuff for all you teachers, homeschoolers and moms out there! :)


My CVC Word Jigsaw Center is included in pack number 4 so be sure to enter that one!! :) And if you're already following me then you don't even need to do anything new, just head on over and enter.


Or click here to buy one for only $3! :) It contains the letters of the alphabet on jigsaw pieces and a bunch of work mats to practice making CVC words on. 

I promise to do my very own giveaway when I reach 100 followers so if you're not following already be sure to join up! :) And don't worry, there will be more recipes and crafts coming in the next few days too! 

Things I've Learnt:
The power of social networking and collaboration.
- I seem to follow a lot of big blogs! In deciding on who to nominate I visited lots of my favourite blogs only to realise just how huge some of them are!! Kinda made me realise I need to spend more time visiting smaller blogs. We need some attention too! :)


Sunday, 18 November 2012

VW Campervan Coasters

Handmade VW Campervan Coasters

It was my sister's birthday last week and she's a bit obsessed with VW campervans so I made her these little coasters. They were pretty easy to make but confirmed what I already knew - I could never open an Etsy shop. I hate making multiples of things!! The first one is great fun, making a pattern, choosing the fabrics, working out how to put it all together, shouting at the sewing machine, all that good stuff! And when it's finished you're sitting there, smiling away, all proud of yourself ... until you realise you have to make 3 more! :(

Campervan Coasters

But it was all worth it in the end. She's a pretty good sister. :) And despite a few issues with the wing mirrors they turned out okay. I used an image I found on google images as my template and then just cut it up to make my pattern. (Here it is if you want to make some!). I was going to add a VW sign but I couldn't cut it small and neat enough and I was under time pressure so I didn't. Next time. :)

Volkswagon Campervan Coasters

And seeing as I spent so long making them I've decided you guys can look at a few more pictures of them. :)
Not my best photography but I was on route to deliver them before I realised I hadn't taken any pictures and din't have my good camera with me.

VW Campervan Coasters

Things I've Learnt:
 - Tiny little things like wing mirrors are impossible to turn the right way out!! If you're thinking of making some of these make sure to make your wing mirrors and wheels way bigger than you think necessary! I lost most of mine to the seam allowance and then had a nightmare turning them.


Friday, 16 November 2012

Friday Freebie #2 - Borders and Jigsaw Puzzles

Friday Freebie time again! :) Here's a link to last week's post in case you missed it, but basically the idea is that once a week I'll give you a little update on the new things I've added to my TPT store and give you a little freebie. Publicity for me, free stuff for you! 
I got some great feedback on my CVC Word Jigsaw center pack from last week so I went with that theme again this week and made two more jigsaw packs! The first teaches colours:


Now as you may I noticed I spell it "colour" but don't worry, I made two packs! The US version uses the spellings "color" and "gray" and the Irish/UK version uses "colour" and "grey". And if there's any other spelling variants that I missed out on please let me know!!

Colour Mixing worksheets - jigsaw puzzle piece

The pack has two purposes. First it contains 12 large jigsaw pieces in different colours with the colour word written on them. These can be used to make a wall display to reinforce spelling, reading and colour identification. And secondly it contains smaller pieces and a set of worksheets. These can be used to explore colour mixing. Slot the pieces together like a jigsaw to show what happens when you mix the colours.

Jigsaw Piece Number math center


I also made a Jigsaw Piece Numbers pack. This one works great as a maths centre. It contains a set of green jigsaw pieces with the numbers 0 -20 and multiples of 10 up to 100 on them and a set of yellow pieces with maths symbols on them. They can be used for free play and exploration, allowing kids to create their own number sentences.

Great Than/Less Than worksheet

Or they can be used in a more structured way with the worksheets I've included. There's 6 worksheets for working on number bonds and simple arithmetic and a set of 7 worksheets for working on greater than/less than. 

Free borders and frames clip art for teachers

And finally - this week's freebie. It's a pack of 13 free .png borders for you to use to dress up your worksheets and other teaching documents. Feel free to use them for whatever you like, just include a link to my blog or TPT store if it's for commercial use. I've actually had this up in my store for a few days but added more borders (including some Christmassy/wintery ones!) to it last night especially for you guys.

Free clipart for teachers and TPT - borders

Free clipart for teachers and TPT - bordersFree clipart for teachers and TPT - borders

I'm working on a great freebie for next week. It's kinda related to jigsaw puzzles but begins with a T... cryptic eh? ha ha If you guess what it is I'll send you a copy first!

Oh and I only have 10 followers on TPT and much as I love and appreciate those 10 I'd love some more!! Pretty please follow along if you download my freebies. :) Or start your very own TPT store and join in the fun! 

Things I've Learnt:
- Hmm lots of things this week actually. I found the forums on the TPT website and learnt lots about marketing and pricing my products. And I joined my first collaborative pinterest boards! I'm pretty excited about these. There's so many great teaching ideas out there and collaborative boards just make it easier to share it!


I'm super proud to say that my free borders were featured on Teaching Blog Addict's Freebie Friday!!! :) If you're looking for some more freebies check out Friday Freebie #1 and Friday Freebie #3.

Freebie Fridays

Thursday, 15 November 2012

Homemade Glitter Name Crayons

Homemade Glitter Name Crayons


So it's all go on the Christmas present production front here. Next up - homemade glitter name crayons! :) I first saw and pinned this idea almost a year ago - re-use old crayons to make cute little heart shaped crayons! I'll probably still do this for my class for Valentine's Day but hearts aren't very Christmas-y and it's been too long since I last melted something so decided to make these cute glitter name crayons instead!

They're so easy to make, especially if you can rope in some little helpers to peel the paper off the crayons! Here's how you do it:

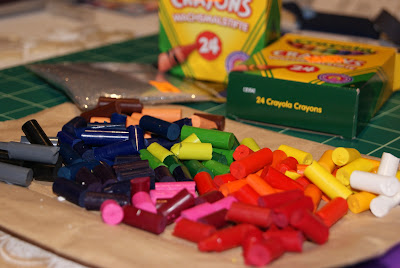
Broken crayons all set for melting!

First peel the paper off your crayons, break them into little pieces and sort them by into colour groups. It's up to you how many different colours you want in each crayon but be careful not to let them mix together too much when they're melted unless you want a whole bunch of brown crayons! 


A craft knife will make the annoying job of peeling so much easier! :) Failing that, pop them in a  basin of warm water for 10 minutes.


Next grab some alphabet ice cube trays. I searched for weeks for these but ended up buying them on amazon. These are the ones I bought. They're freezer and oven safe so perfect for this!

Melted crayon letters

Pour a little glitter into the bottom of the ice cube tray and roll your little crayon bits in more glitter. Then slot them into the letter spaces. 


Put them on a tray and pop them into the oven. It's a good idea to cover your tray in tinfoil in case you get any spillages, I can't imagine cleaning crayon out of the oven is much fun! 

I had them in on a low heat (about 140° C) for about 5 - 10 minutes. But just keep an eye on them and keep checking them. Make sure they're fully melted and then take them out of the oven to cool. Be careful moving the tray, the more you shake them the more the colours will mix.


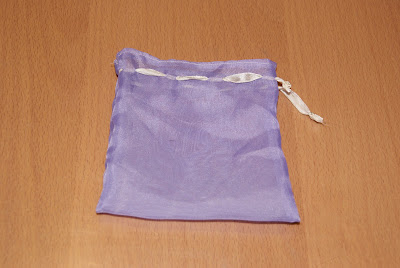
While I was waiting for them to cool I sewed some little bags to keep the crayons in. :)


Then pop them out of their trays and into their little bags! 


They actually come out quite easily, I didn't have one broken crayon. Although I suppose if they do break you know exactly how to fix that! :)

Homemade glitter alphabet crayons

The letters can of course also be used to make lots of other words and are great for some tactile letter exploration. Next I'm going to make a full alphabet set for school. If I can bring myself to peel more crayons that is... :)


Things I've Learnt:
- As ever when crayons are concerned it's worth paying the little extra for good quality ones! At a push I'd mix in a few old cheap ones with the Crayola ones.
- Peeling the paper off is definitely the most time consuming part of making these. So either soak them in warm water first or use a craft knife to slice the paper wrapper open.
- I wish I'd added a bit more glitter but I only had glitter in a bag and it was so messy!! Next time I'll get a little tube and sprinkle some more in. Cos really you can never have too much glitter in life. :)
- Use a toothpick to swirl the melted crayons if you want the colours to marble a little or mix completely. I didn't touch most of mine (bar the light blue one) as I wanted the colours to stay a little distinct.


Monday, 12 November 2012

Nativity Hand Puppets

Thought I'd share these little felt nativity hand puppets that I made for Christmas last year. This was in my pre-sewing machine days so I just hand sewed the puppet and used craft glue to attach the fabric. I wish I'd sewn the pieces on now as it would look much nicer but they're holding up pretty well!

Here's Mary and Joseph and baby Jesus. All the puppets have a little velcro spot on them so they can give and receive gifts. Sheep from the shepherds and gold, frankincense and myrrh from the wise men. :)

The angel and the shepherds and their sheep. The sheep were the most fun to make!  


And finally, the three wise men. The one in the middle is my favourite, mainly because of the awesome fabric my cousin gave me for his clothes. And the guy on the right is supposed to be carrying a little chest, not a handbag... :)

*Update - I've had a few requests for patterns for these puppets. Unfortunately I don't have them anymore as I made these last year (a.k.a. pre- blog!) and threw them away. But I based them on ones I found over at TipJunkie and I just found some cute ones over at This and That for more inspiration too. You just need a hand puppet base that's big enough for your/your kids' hands and then you can use the same template for the faces and clothes and just change the fabric. I just made my pattern pieces on scraps of paper.

**Another Update - Although the puppets are not for sale I have made them into images and created a nativity word wall and flashcard set from them which is available here in my TPT store.
Nativity Word Wall and Flashcards

Things I've Learnt:
- Ha ha well since this time last year? Sewing machine's aren't so scary after all.


LinkWithin

Related Posts Plugin for WordPress, Blogger...