Showing posts with label felt. Show all posts

Monday, 12 November 2012

Nativity Hand Puppets

Thought I'd share these little felt nativity hand puppets that I made for Christmas last year. This was in my pre-sewing machine days so I just hand sewed the puppet and used craft glue to attach the fabric. I wish I'd sewn the pieces on now as it would look much nicer but they're holding up pretty well!

Here's Mary and Joseph and baby Jesus. All the puppets have a little velcro spot on them so they can give and receive gifts. Sheep from the shepherds and gold, frankincense and myrrh from the wise men. :)

The angel and the shepherds and their sheep. The sheep were the most fun to make!  


And finally, the three wise men. The one in the middle is my favourite, mainly because of the awesome fabric my cousin gave me for his clothes. And the guy on the right is supposed to be carrying a little chest, not a handbag... :)

*Update - I've had a few requests for patterns for these puppets. Unfortunately I don't have them anymore as I made these last year (a.k.a. pre- blog!) and threw them away. But I based them on ones I found over at TipJunkie and I just found some cute ones over at This and That for more inspiration too. You just need a hand puppet base that's big enough for your/your kids' hands and then you can use the same template for the faces and clothes and just change the fabric. I just made my pattern pieces on scraps of paper.

**Another Update - Although the puppets are not for sale I have made them into images and created a nativity word wall and flashcard set from them which is available here in my TPT store.
Nativity Word Wall and Flashcards

Things I've Learnt:
- Ha ha well since this time last year? Sewing machine's aren't so scary after all.


Thursday, 8 November 2012

Etch-a-Sketch iPad Cover

Etch-a-Sketch iPad cover tutorial


I had a lot of fun making my first iPad cover so I decided to make another one! :) As much as I love my iPad I think I probably got more enjoyment from toys I had as a kid, like my Etch-a-Sketch. So why not combine the two! I did a little searching and found this great iPad cover at Smashed Peas and Carrots and decided to have a go myself. She has a super tutorial so if this doesn't make sense then check it out! I think hers is for an original iPad though, this was made for my new iPad. I was a little generous with the dimensions cos I wanted it to fit in with a thin rubber cover on it too so just test yours as you go!

                              It's a lot of fun to make! Want to make one? Well keep reading!


Here's what you'll need: 
- 2 pieces red felt for the inside @ 10" x 12"
- 2 pieces red felt for the outisde @ 10.5" x 12"
- 1 piece grey felt approx 8" x 10"
- 2 pieces wadding @ 10.5" x 12"
- red and grey thread, white embroidery thread
- velcro (preferably red)
- 2 large white buttons


Once you've cut out all your pieces, pin the velcro to the top of two pieces of red felt. 


Sew them in place, making sure they will line up properly. Use at least two or three rows of stitches to keep it nice and secure. We don't want your little iPad falling out! :)


Once that's done, pin the two pieces of felt rights sides together. You velcro should be closed and hidden, like the picture. Sew down the sides and across the bottom but leave a gap of about 3 or 4 inches at the bottom for turning later. Make sure you don't sew across the top!
This will be the inside of your cover so if you're not sure how much seam allowance to leave, test to see if your iPad fits in snugly!


Now we can get to work on the outside of your cover. First you need to cut a rectangle out of one piece of red felt. You'll be putting the grey felt behind it as your Etch-a-Sketch screen. I wish I'd made my "screen" a little smaller but I'll give you the dimensions I used and let you make up your own minds! It's 6" x 8¾".


This is the really fun part! You could do any design you liked on this. I went for simple, figured sewing it with my sewing machine might be almost as tricky as drawing it on an Etch-a-Sketch! First I drew my design on the felt using a vanishing ink fabric pen and my trusty ruler. Then I sewed over the lines with grey thread, easy. :)


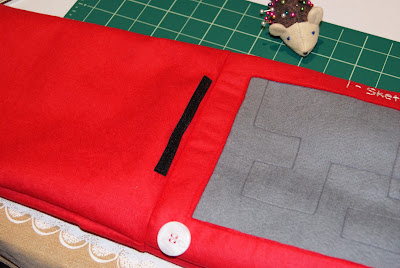
Next you place the grey felt behind the red frame and pin it in place. Sew around the edge to secure it in place.


Sew your two large white buttons in place. Now you have the knobs for your Etch-a-Sketch. 


Use your embroidery thread to add some text at the top. Make sure to leave enough space at the top to allow for your seam when you sew it all together! (This is why I wish I'd made my "screen" a bit smaller).


Sew your wadding onto each piece of red felt. This will keep it in place for the next step. Make sure you sew it to the wrong side of your front piece!


Pin your two pieces of felt/wadding together, right sides facing. Sew around the two sides and the bottom. Leave the top open.


Clip the corners, trim the excess and press your seams. Then turn your cover the right way out.


Now take the inside piece that you made earlier. Place the cover inside it so it looks like the picture above. 


Pin the pieces together and sew carefully along the top. 


Using the gap at the bottom of your inside piece turn your cover the right way out. The two pieces should be joined as they are in the picture. Sew across the bottom of the inside piece to close the gap and push it inside the cover.

iPad in its Etch a Sketch cover

Test drive it with your iPad! :)

Things I've Learnt:
- Leave a little extra felt on the top/open end as when you sew it up at the end you'll lose a little space.
- Press the seams, I'm lazy so I didn't and regret it. :(
- Sew the buttons on after you sew in the grey felt, much easier than trying to navigate around buttons with your sewing machine!
- If you don't have a vanishing ink fabric marker then print or draw your design and pin the paper to your felt. I did it this way when I made my felt marbles maze and it worked out great!
- I'm thinking this would make a cute phone or kindle cover too.
- You could always buy a hard cover one if you're not a sewer. :)


Wednesday, 10 October 2012

Butterfly Cushion Tutorial

Butterfly Cushion Tutorial

I had great plans for this weekend's sewing - another iPad cover, little oven mitts, more sock monkeys, not to mention my plan to learn how to crochet! But well I found this cute butterfly cushion cover over at Ruffles and Stuff and I just had to make one of my own. :) I used different sized butterflies in a random pattern as I just didn't trust myself to line them all up as nicely as she did! But the end result is pretty cute I think. :)

Want to make a butterfly cushion of your own? Of course you do! 


Choose some fabric for the main part of your cushion and a cushion pad. You can do this all in felt but I had the perfect sized piece of soft brushed cotton so I used that instead.


Wrap your fabric around your cushion pad to see how much you need. Leave about 1/2" overlap at the edges and 4 - 5" overlap for the flap at the back. There's no buttons or zips so make sure it's overlapped enough and then cut it out.


Pick some cute butterfly templates (or download mine here). Cut them out, trace around them on some good quality wool felt and cut out. 


It's up to you how many you do or what sizes you like but I used 1 of the biggest two, 2 or the next two and 3 of the smallest butterflies.


Pin your felt butterflies in place on your cushion.


Sew around the centre of each butterfly so that the wings are still free to flutter but the butterflies are secured in place.


Next sew a hem on each end of your fabric. Just fold it over, pin in place and sew a straight line along it. Or a slightly wavy one if you're like me! :) I only hemmed the edge that you can see from the outside but then sewed it wrong and had to rip and redo! Oops.


Next take your fabric and wrap it around your cushion pad again. Make sure it's inside out (i.e the butterflies are facing the cushion and can't be seen), then pin the overlap closed.


 Pull the cushion pad out and pin the sides.


Sew along the two sides. (This pic is from my first attempt - if you're only sewing one hem you should have the raw edge visible here!) 


Then turn your cushion cover the right way out and pop your cushion pad inside! This is what the back of mine looks like.

Butterfly Cushion Cover

And this is the front. Flutter by cute little butterflies. :)

Things I've learnt:
- Use a good quality wool felt, not your craft shop stuff. It looks and feels much nicer and it'll hold its shape better.
- Make sure to line up the front of your cushion properly. I really wish I'd taken a second to check mine, those big butterflies should be a little closer to the top.
- Just sew a hem on both ends of your fabric. Then you won't make my mistake and sew it wrong and end up with the unfinished edge on show. On the plus side my stitch ripping skills are coming on nicely!
- As there's no zip or buttons or anything this is really quick and easy to make. My favourite kind of project! The trickiest part is negotiating all the fabric around the machine as you sew the butterflies on.
- You could make this a bit fancier and add a little detail to the butterflies but I kinda like it plain and simple like this.

Wednesday, 19 September 2012

Day 23 - Felt Mazes

I'm definitely on a bit of a felt buzz at the moment! Here's my latest felty creation:


It's a felt maze! As usual with all things crafty someone else had not only thought of this before me but had also created a super tutorial for me to follow! Check out Ladybird Ln if my pics don't make any sense. :)


So first step is to pick some co-ordinating felt and material and search Google images for  maze. Use your maze as a template and cut out your fabric and felt leaving a small seam allowance.


Cut out two little squares of your fabric to mark the start and end of your maze. Mine are about 2 inches. Fold them in half to make triangles and pin to your felt. This will be the front side of your maze.


Add a ribbon and pin it in place. Sew across the long side of the triangles. Leave the outside sides (they'll be sewed in a minute!)


Pin your felt and fabric right sides together and sew around the outside. 


Make sure to leave a gap so you can turn it the right way out.


Turn and press. Love the ribbon tab! :)


Pin your maze in place and sew over the lines. Don't sew the outside lines as you'll need to add your marble! Up to you what colour thread you go for. My maze is a little bit trickier so I used black thread but you could use a co-ordinating colour if your maze was simpler (or your kids like a challenge). I kinda wish I'd used white thread for the fabric side so you could try it either way. Next time! :)


Then the fun part - rip that paper off!


Put your marble (or button in my case!) in and test drive. Make sure it's easy to move through the maze. Then use a zig-zag stitch around the outside to close up the gap and finish off your maze.

The finished product - the back


The finished product - the front. A-maze-ing!


Things I've learnt:
- Make sure the walls of your maze are wide enough to fit your marble or you'll end up having to use a button like me! (the button does work fine but its a bit harder to find and move about)
- Make sure the space you leave for turning the maze the right way out is big enough! I always end up with struggling with a tiny gap!
- Don't leave a giant seam allowance or you'll end up losing most of your start and finish triangles like I did. :(


LinkWithin

Related Posts Plugin for WordPress, Blogger...