Showing posts with label Christmas. Show all posts

Tuesday, 25 December 2012

Happy Christmas!!!

Happy Christmas
Happy Happy Christmas everybody!!! 

I'm not gonna lie, this post may have been scheduled as right about now I'm probably sitting at the table in my aunt's house eating Christmas dinner (turkey, ham, sausage stuffing, roast potatoes, loads of gravy mmmm...), pulling crackers, exchanging presents or playing board games with my wonderful family. But I just wanted to be sure to wish all of you a wonderful Christmas also.

As a little Christmas present to you all I'm having a sale at my TPT store until tomorrow. St. Stephen's Day  (Dec. 26th) is a becomming a bit like an Irish version of Black Friday as this is when the January Sales start. So I'm giving you guys 20% off everything in my store!!


Sunday, 23 December 2012

Strawberry Christmas Tree

Strawberry Christmas Tree
I have a few quick little Christmassy things that I want to get up on the blog before Christmas, in case anyone is in need of a last little bit of inspiration! :) I had seen these cute strawberry Christmas tress all over pinterest (like this one from Can't Stop Making Things) so I just had to have a go myself!

It sounded pretty simple - grab a styrofoam cone, pour melted chocolate on it and stick the strawberries to it. Unfortunately, life is never simple! :) Firstly, I couldn't find a styrofoam cone anywhere! I eventually found a site I could order them from online but they wouldn't have arrived on time. So I went to a flower shop and bought a piece of oasis! I made a cone shape out of a piece of card and cut the oasis to fit underneath it. Then I covered that in baking parchment and poured the chocolate on!

I was feeling pretty proud of my problem solving skills. But I wasn't finished yet. I started sticking on the strawberries but they wouldn't stick! They just kept sliding down the cone! I'm sure if I had had more time I could have done the bottom row and waited for the chocolate to harden a little and then do the next layer. But I was in a rush, guests were starting to arrive!

Strawberry Christmas Tree

So I roped in some helpers (my sister and cousin) and we decided to try pushing cocktail sticks into the cone first and then sticking the strawberries onto them! If the cone had been made of styrofoam this would have been genius! But getting cocktail sticks through baking parchment, card and oasis is tough!! We persevered though and it was all looking great until ... we ran out of strawberries!! 

So we ended up with a half empty tree of chocolate covered strawberries. :( But it was still a huge hit! Everyone loved it! 

Things I've Learnt:
- Buy extra strawberries!!
- Use a styrofoam cone if possible.
- Keep some cocktail sticks handy in case your strawberries start to slide. 


Sunday, 16 December 2012

Friday Freebie #6 - Rice Krispie Coal

Rice Krispie Coal
Umm so it appears I'm late for Friday Freebie again this week... Sorry!! I may have to make Friday Freebie a once a month thing, we'll see. I promise it won't vanish completely though! 

Firstly, there's still a few hours until my 100 Follower Giveaway ends!! You can win two cute sock monkeys and a whole bunch of awesome teaching resources so click here if you want in! :)

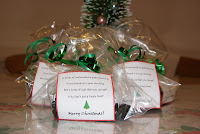
And secondly your Freebie! :) When I was small I remember being told that if I wasn't good that Santa would bring me nothing but coal on Christmas Eve! So when I saw these cute Lump of Coal Rice Krispie Treats on pinterest I knew I had to give them a try. I know a few people who've been a little bit naughty this year! :)

They're easy and fun to make and taste pretty delicious so I though they'd make cute little presents to give to your class! But seeing as little kids tend not to like being told they're naughty I came up with this cute little poem to let them know these lumps of coal are pretty special!

Lump of Coal poem

The coal is really easy to make:
- Just use your normal Rice Krispie Treat recipe (I use this one) and add black food colouring! I found some at a kitchen supply store but you can buy some on amazon too. I used liquid food colouring and had no problems so go for that over gel/paste if you can. Once you've melted your marshmallows and butter just add in enough drops to turn the mixture black.
- Then mix in your Rice Krispies until they're fully covered.
- The next part is the messy bit. Lay out some baking paper on your counter and spoon little odd shaped dollops of the mixture onto the paper. You could also put butter on your hands and use them but be warned it's very sticky!!
- Then once they've set a little you can put a few into a clear plastic bag and tie it with ribbon.
- Print out these little poems onto card and tie them to the ribbon or onto sticker paper and stick them to the bags.
- And that's it! :)

Things I've Learnt:
- Don't worry about the size or shape of these little guys, the odder they are the better!
- Remember to take pictures of yours once they're all bagged up! I forgot! So all you get is the few crap pictures I took on my phone. :(

*Update: I made some more and tried using disposable plastic gloves spread with butter to make the - much easier!


Thursday, 13 December 2012

Princess Super Hero Cape

Princess Super Hero Cape and Mask - Being Inspired

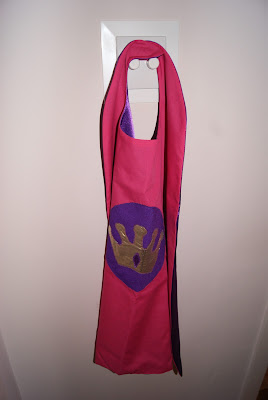
I'm trying to make as many of my Christmas presents as possible this year but I can't share many of them yet as their recipients might see them! But I'm pretty sure the little girl who's getting this Princess Super Hero Cape doesn't read my blog. :) So I thought I'd share some pictures of it.

There are loads of great tutorials for making capes so I'm not going to do a full tutorial but these are the blogs that inspired mine: I used the patterns from Serving Pink Lemonade for the top of the cape and the princess crown and Living Locurto for the eye mask. And I got the dimensions for my cape from How Does She

Princess Crown pattern

Once you've cut out your pieces sew your logo onto the center. My cape is purple on one side with a SuperGirl T logo (the little princess' name begins with T) and pink with a princess crown on the other side. I had found gorgeous gold fabric to use but it frays really easily so in retrospect it wasn't the best choice. I ended up using a zig-zag stitch around the outside so hopefully that'll keep it secure but use felt if you can, much less hassle!


Then just pin the pieces right sides together and sew around the outside. Don't forget to leave a gap so you can turn it.


It's a good idea to cut into the excess around the collar so it doesn't pucker so much. Then just turn it the right way out, press it and sew up the gap using a ladder stitch.

Purple Princess Super Hero Cape

This is purple side of the cape (which needs to be ironed!). I also made a Princess Super Hero mask to match, pink on one side and purple on the other. You could also make super hero cuffs but this costume is more Princess than Super Hero so I might add a crown or wand, we'll see!

Pink Princess Super Hero Cape


I'll make sure to update this after Christmas with pictures of it in action but until then this little cape is just hanging out, waiting to be worn!

Things I've Learnt:
- It was a little tricky working out what size to make it as I can't measure the little princess! But I'm hoping it'll be okay and I put a large piece of velcro on the neck so it'll be easy to adjust it. 
- You could attach the velcro before sewing the two pieces together but it felt it would be a bit more secure to do it afterwards, just use co ordinating thread to keep it looking pretty!
- I had a huge disaster when I was cutting out the purple fabric. I had it folded in half and traced the template for the collar on the wrong side!! So when I opened it out the collar pieces went the wrong way! :( I tried to patchwork fix it but ended up buying more fabric, it is a Christmas present after all! But just make sure you double check before you cut!!
- You obviously could make this in black and red for a Batman and Superman cape if Princesses aren't your thing. :) Next time I have some free time I'm going to make a set for my classroom role-play area!

Oh and be sure to enter my Giveaway to win two cute sock monkeys and lots of teaching resources!


Saturday, 1 December 2012

Friday Freebie #4 - Christmas Letter Mazes and Santa's Secret Codes


Friday Freebie time again!! :) This week I have some super cute Christmas themed letter mazes for you! But first here's a little update on some of the other new stuff I've been working on for my TPT store:

Crack the Code - Santa's Secret Code worksheet pack

I spent way too long on this one but I think it was worth it! It's called "Santa's Secret Code" and it's a really cute little activity for excited kids this Christmas! They'll love trying to crack Santa's code and work on some problem solving skills as they do it. 

Secret coded letter from Santa Claus

It includes a coded letter from Santa, 16 word puzzles, an A to Z pictoral code of Holiday pictures,  worksheets to create their own word puzzles and their own secret code and it comes with both colour and b&w copies. And you can also create little code cards to easily create new word puzzles for your class! Click here to find out more!


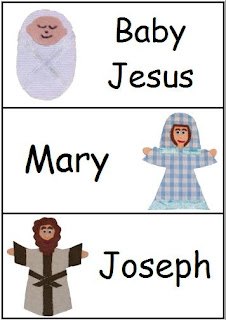
Remember the nativity hand puppets I made? Well I had a lot of people asking me for patterns to make them or it I sold them anywhere. Unfortunately I made them last year so I don't have the patterns anymore and I'm way to slow at sewing for it to be profitable to sell them. But I decided I could still do something with them - I turned them into nativity flashcards and a word wall! 


These are great to reinforce reading and spelling words associated with the nativity and can also be used to retell the story of the first Christmas. :) 


Letter identification worksheet freebie - help Santa find Rudolph!

And now this week's freebie! Sticking with the Christmas theme, this one's for the little kids - Christmas letter mazes! They can practice letter identification skills while they trace a path through the maze and help Santa and the penguin to get to the end. 

Letter Maze - help Santa find Rudolph

It'll make a cute addition to your literacy centers this winter, just print and laminate and it's ready to go. :) There are 6 mazes, focusing on the letters S and P and using upper and lower case letters. And did I mention it's free? :) 
Click here to download your Friday Freebie now.

Want some more freebies? Check out the previous Friday Freebies - - > here.


Thursday, 15 November 2012

Homemade Glitter Name Crayons

Homemade Glitter Name Crayons


So it's all go on the Christmas present production front here. Next up - homemade glitter name crayons! :) I first saw and pinned this idea almost a year ago - re-use old crayons to make cute little heart shaped crayons! I'll probably still do this for my class for Valentine's Day but hearts aren't very Christmas-y and it's been too long since I last melted something so decided to make these cute glitter name crayons instead!

They're so easy to make, especially if you can rope in some little helpers to peel the paper off the crayons! Here's how you do it:

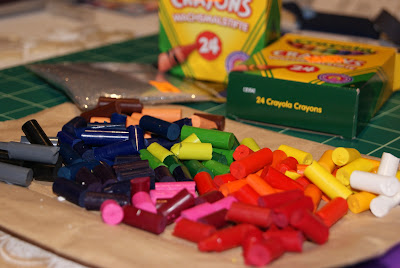
Broken crayons all set for melting!

First peel the paper off your crayons, break them into little pieces and sort them by into colour groups. It's up to you how many different colours you want in each crayon but be careful not to let them mix together too much when they're melted unless you want a whole bunch of brown crayons! 


A craft knife will make the annoying job of peeling so much easier! :) Failing that, pop them in a  basin of warm water for 10 minutes.


Next grab some alphabet ice cube trays. I searched for weeks for these but ended up buying them on amazon. These are the ones I bought. They're freezer and oven safe so perfect for this!

Melted crayon letters

Pour a little glitter into the bottom of the ice cube tray and roll your little crayon bits in more glitter. Then slot them into the letter spaces. 


Put them on a tray and pop them into the oven. It's a good idea to cover your tray in tinfoil in case you get any spillages, I can't imagine cleaning crayon out of the oven is much fun! 

I had them in on a low heat (about 140° C) for about 5 - 10 minutes. But just keep an eye on them and keep checking them. Make sure they're fully melted and then take them out of the oven to cool. Be careful moving the tray, the more you shake them the more the colours will mix.


While I was waiting for them to cool I sewed some little bags to keep the crayons in. :)


Then pop them out of their trays and into their little bags! 


They actually come out quite easily, I didn't have one broken crayon. Although I suppose if they do break you know exactly how to fix that! :)

Homemade glitter alphabet crayons

The letters can of course also be used to make lots of other words and are great for some tactile letter exploration. Next I'm going to make a full alphabet set for school. If I can bring myself to peel more crayons that is... :)


Things I've Learnt:
- As ever when crayons are concerned it's worth paying the little extra for good quality ones! At a push I'd mix in a few old cheap ones with the Crayola ones.
- Peeling the paper off is definitely the most time consuming part of making these. So either soak them in warm water first or use a craft knife to slice the paper wrapper open.
- I wish I'd added a bit more glitter but I only had glitter in a bag and it was so messy!! Next time I'll get a little tube and sprinkle some more in. Cos really you can never have too much glitter in life. :)
- Use a toothpick to swirl the melted crayons if you want the colours to marble a little or mix completely. I didn't touch most of mine (bar the light blue one) as I wanted the colours to stay a little distinct.


Monday, 12 November 2012

Nativity Hand Puppets

Thought I'd share these little felt nativity hand puppets that I made for Christmas last year. This was in my pre-sewing machine days so I just hand sewed the puppet and used craft glue to attach the fabric. I wish I'd sewn the pieces on now as it would look much nicer but they're holding up pretty well!

Here's Mary and Joseph and baby Jesus. All the puppets have a little velcro spot on them so they can give and receive gifts. Sheep from the shepherds and gold, frankincense and myrrh from the wise men. :)

The angel and the shepherds and their sheep. The sheep were the most fun to make!  


And finally, the three wise men. The one in the middle is my favourite, mainly because of the awesome fabric my cousin gave me for his clothes. And the guy on the right is supposed to be carrying a little chest, not a handbag... :)

*Update - I've had a few requests for patterns for these puppets. Unfortunately I don't have them anymore as I made these last year (a.k.a. pre- blog!) and threw them away. But I based them on ones I found over at TipJunkie and I just found some cute ones over at This and That for more inspiration too. You just need a hand puppet base that's big enough for your/your kids' hands and then you can use the same template for the faces and clothes and just change the fabric. I just made my pattern pieces on scraps of paper.

**Another Update - Although the puppets are not for sale I have made them into images and created a nativity word wall and flashcard set from them which is available here in my TPT store.
Nativity Word Wall and Flashcards

Things I've Learnt:
- Ha ha well since this time last year? Sewing machine's aren't so scary after all.


LinkWithin

Related Posts Plugin for WordPress, Blogger...