Showing posts with label sewing. Show all posts

Thursday, 13 December 2012

Princess Super Hero Cape

Princess Super Hero Cape and Mask - Being Inspired

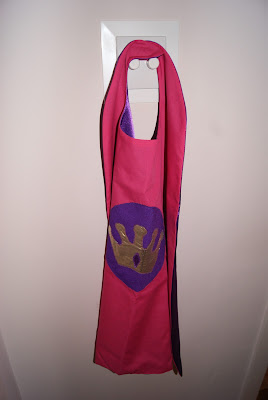
I'm trying to make as many of my Christmas presents as possible this year but I can't share many of them yet as their recipients might see them! But I'm pretty sure the little girl who's getting this Princess Super Hero Cape doesn't read my blog. :) So I thought I'd share some pictures of it.

There are loads of great tutorials for making capes so I'm not going to do a full tutorial but these are the blogs that inspired mine: I used the patterns from Serving Pink Lemonade for the top of the cape and the princess crown and Living Locurto for the eye mask. And I got the dimensions for my cape from How Does She

Princess Crown pattern

Once you've cut out your pieces sew your logo onto the center. My cape is purple on one side with a SuperGirl T logo (the little princess' name begins with T) and pink with a princess crown on the other side. I had found gorgeous gold fabric to use but it frays really easily so in retrospect it wasn't the best choice. I ended up using a zig-zag stitch around the outside so hopefully that'll keep it secure but use felt if you can, much less hassle!


Then just pin the pieces right sides together and sew around the outside. Don't forget to leave a gap so you can turn it.


It's a good idea to cut into the excess around the collar so it doesn't pucker so much. Then just turn it the right way out, press it and sew up the gap using a ladder stitch.

Purple Princess Super Hero Cape

This is purple side of the cape (which needs to be ironed!). I also made a Princess Super Hero mask to match, pink on one side and purple on the other. You could also make super hero cuffs but this costume is more Princess than Super Hero so I might add a crown or wand, we'll see!

Pink Princess Super Hero Cape


I'll make sure to update this after Christmas with pictures of it in action but until then this little cape is just hanging out, waiting to be worn!

Things I've Learnt:
- It was a little tricky working out what size to make it as I can't measure the little princess! But I'm hoping it'll be okay and I put a large piece of velcro on the neck so it'll be easy to adjust it. 
- You could attach the velcro before sewing the two pieces together but it felt it would be a bit more secure to do it afterwards, just use co ordinating thread to keep it looking pretty!
- I had a huge disaster when I was cutting out the purple fabric. I had it folded in half and traced the template for the collar on the wrong side!! So when I opened it out the collar pieces went the wrong way! :( I tried to patchwork fix it but ended up buying more fabric, it is a Christmas present after all! But just make sure you double check before you cut!!
- You obviously could make this in black and red for a Batman and Superman cape if Princesses aren't your thing. :) Next time I have some free time I'm going to make a set for my classroom role-play area!

Oh and be sure to enter my Giveaway to win two cute sock monkeys and lots of teaching resources!


Tuesday, 27 November 2012

Fabric Tangrams

Fabric Tangram House - Free Template


I know I promised this post on making fabric tangrams on Saturday but I ran into a little problem! I had it all set to go and was just uploading the photos when Blogger informed me that I'd run out of photo space!!! It seems that my plan of lazily uploading giant pictures without re-sizing them had finally caught up on me. Newbie bloggers take note - re-size!!

But after a bit of searching I've discovered a few work arounds. Firstly I connected my blog email address to the blog and set it as a contributor which means if I log in through it I can still upload photos. Basically that email address has its own photo storage allowance. But it's a bit of a pain so the other thing I discovered is that as long as you keep your pictures smaller than 1026 pixels you can upload to your hearts content. So for now I'm okay again! And I suppose I'll start re-sizing some old pictures and replacing them and stop uploading giant pictures! Well after today. :)

Fabric Tangrams

Now back to the task at hand. On Friday I gave you my Friday Freebie - a tangram booklet and template. I'm a huge fan of tangrams but I started thinking how I could make them even more fun. The answer - make them out of fabric instead of card! :) I originally saw this pin of a "tangram-esque fabric puzzle" on pinterest from Beauty All Around. It's amazing, she made 42 little coloured fabric squares! There's no way I'd have the patience for that but I figured I could give a normal 7 piece tangram set a go.


Click here to download the templates I used. I made mine yellow on one side and red on the other but you could do them all  in different colours or just use one. I cut out the bigger template and traced around each piece twice, once on red fabric and once on yellow. I used the smaller template to cut out the wadding to stuff them.

Then pin the pieces right sides together and sew around the sides. Make sure to leave a gap so you can turn and stuff them. The trickiest part for me was sewing the corners on the triangular ones. 


Then turn the pieces the right way out and stuff them with your little pieces of wadding. Use a ladder stitch to neatly sew up the gaps and then you're all done!

                    Fabric Tangram House                      Fabric Tangram Cat
                           Fabric Tangram Swan


Then have some fun and see what pictures you can make! There's loads of ideas for puzzles on the internet but start with trying to recreate the square. :)

And of course do download my little booklet. It has 12 shadow puzzles in it with the solutions at the end. And it's free! I made a little bag to keep the pieces in and the booklet fits in perfectly too if you print multiple pages on one piece of paper.

I found this cute book that would go well with the tangrams too. It's kinda a take on the three little pigs with some tangram puzzles thrown in. :)


Things I've learnt:
- This really should be a thing I have not learnt, I still left too tiny a gap and had zero fun turning and stuffing some of my tangrams. Will I ever learn?
- But I did learn lots about re-sizing pictures and avoiding paying Google any money. ha ha Love you really Google.
- And I learnt that fabric tangrams are so much more fun to play with than card ones. I made these as a gift but might have to keep them and make another set!

Sunday, 18 November 2012

VW Campervan Coasters

Handmade VW Campervan Coasters

It was my sister's birthday last week and she's a bit obsessed with VW campervans so I made her these little coasters. They were pretty easy to make but confirmed what I already knew - I could never open an Etsy shop. I hate making multiples of things!! The first one is great fun, making a pattern, choosing the fabrics, working out how to put it all together, shouting at the sewing machine, all that good stuff! And when it's finished you're sitting there, smiling away, all proud of yourself ... until you realise you have to make 3 more! :(

Campervan Coasters

But it was all worth it in the end. She's a pretty good sister. :) And despite a few issues with the wing mirrors they turned out okay. I used an image I found on google images as my template and then just cut it up to make my pattern. (Here it is if you want to make some!). I was going to add a VW sign but I couldn't cut it small and neat enough and I was under time pressure so I didn't. Next time. :)

Volkswagon Campervan Coasters

And seeing as I spent so long making them I've decided you guys can look at a few more pictures of them. :)
Not my best photography but I was on route to deliver them before I realised I hadn't taken any pictures and din't have my good camera with me.

VW Campervan Coasters

Things I've Learnt:
 - Tiny little things like wing mirrors are impossible to turn the right way out!! If you're thinking of making some of these make sure to make your wing mirrors and wheels way bigger than you think necessary! I lost most of mine to the seam allowance and then had a nightmare turning them.


Monday, 12 November 2012

Nativity Hand Puppets

Thought I'd share these little felt nativity hand puppets that I made for Christmas last year. This was in my pre-sewing machine days so I just hand sewed the puppet and used craft glue to attach the fabric. I wish I'd sewn the pieces on now as it would look much nicer but they're holding up pretty well!

Here's Mary and Joseph and baby Jesus. All the puppets have a little velcro spot on them so they can give and receive gifts. Sheep from the shepherds and gold, frankincense and myrrh from the wise men. :)

The angel and the shepherds and their sheep. The sheep were the most fun to make!  


And finally, the three wise men. The one in the middle is my favourite, mainly because of the awesome fabric my cousin gave me for his clothes. And the guy on the right is supposed to be carrying a little chest, not a handbag... :)

*Update - I've had a few requests for patterns for these puppets. Unfortunately I don't have them anymore as I made these last year (a.k.a. pre- blog!) and threw them away. But I based them on ones I found over at TipJunkie and I just found some cute ones over at This and That for more inspiration too. You just need a hand puppet base that's big enough for your/your kids' hands and then you can use the same template for the faces and clothes and just change the fabric. I just made my pattern pieces on scraps of paper.

**Another Update - Although the puppets are not for sale I have made them into images and created a nativity word wall and flashcard set from them which is available here in my TPT store.
Nativity Word Wall and Flashcards

Things I've Learnt:
- Ha ha well since this time last year? Sewing machine's aren't so scary after all.


Thursday, 8 November 2012

Etch-a-Sketch iPad Cover

Etch-a-Sketch iPad cover tutorial


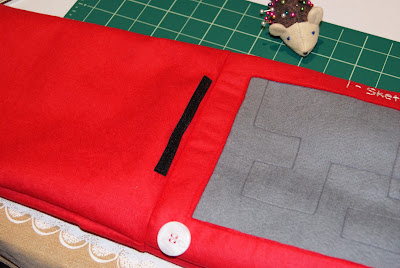
I had a lot of fun making my first iPad cover so I decided to make another one! :) As much as I love my iPad I think I probably got more enjoyment from toys I had as a kid, like my Etch-a-Sketch. So why not combine the two! I did a little searching and found this great iPad cover at Smashed Peas and Carrots and decided to have a go myself. She has a super tutorial so if this doesn't make sense then check it out! I think hers is for an original iPad though, this was made for my new iPad. I was a little generous with the dimensions cos I wanted it to fit in with a thin rubber cover on it too so just test yours as you go!

                              It's a lot of fun to make! Want to make one? Well keep reading!


Here's what you'll need: 
- 2 pieces red felt for the inside @ 10" x 12"
- 2 pieces red felt for the outisde @ 10.5" x 12"
- 1 piece grey felt approx 8" x 10"
- 2 pieces wadding @ 10.5" x 12"
- red and grey thread, white embroidery thread
- velcro (preferably red)
- 2 large white buttons


Once you've cut out all your pieces, pin the velcro to the top of two pieces of red felt. 


Sew them in place, making sure they will line up properly. Use at least two or three rows of stitches to keep it nice and secure. We don't want your little iPad falling out! :)


Once that's done, pin the two pieces of felt rights sides together. You velcro should be closed and hidden, like the picture. Sew down the sides and across the bottom but leave a gap of about 3 or 4 inches at the bottom for turning later. Make sure you don't sew across the top!
This will be the inside of your cover so if you're not sure how much seam allowance to leave, test to see if your iPad fits in snugly!


Now we can get to work on the outside of your cover. First you need to cut a rectangle out of one piece of red felt. You'll be putting the grey felt behind it as your Etch-a-Sketch screen. I wish I'd made my "screen" a little smaller but I'll give you the dimensions I used and let you make up your own minds! It's 6" x 8¾".


This is the really fun part! You could do any design you liked on this. I went for simple, figured sewing it with my sewing machine might be almost as tricky as drawing it on an Etch-a-Sketch! First I drew my design on the felt using a vanishing ink fabric pen and my trusty ruler. Then I sewed over the lines with grey thread, easy. :)


Next you place the grey felt behind the red frame and pin it in place. Sew around the edge to secure it in place.


Sew your two large white buttons in place. Now you have the knobs for your Etch-a-Sketch. 


Use your embroidery thread to add some text at the top. Make sure to leave enough space at the top to allow for your seam when you sew it all together! (This is why I wish I'd made my "screen" a bit smaller).


Sew your wadding onto each piece of red felt. This will keep it in place for the next step. Make sure you sew it to the wrong side of your front piece!


Pin your two pieces of felt/wadding together, right sides facing. Sew around the two sides and the bottom. Leave the top open.


Clip the corners, trim the excess and press your seams. Then turn your cover the right way out.


Now take the inside piece that you made earlier. Place the cover inside it so it looks like the picture above. 


Pin the pieces together and sew carefully along the top. 


Using the gap at the bottom of your inside piece turn your cover the right way out. The two pieces should be joined as they are in the picture. Sew across the bottom of the inside piece to close the gap and push it inside the cover.

iPad in its Etch a Sketch cover

Test drive it with your iPad! :)

Things I've Learnt:
- Leave a little extra felt on the top/open end as when you sew it up at the end you'll lose a little space.
- Press the seams, I'm lazy so I didn't and regret it. :(
- Sew the buttons on after you sew in the grey felt, much easier than trying to navigate around buttons with your sewing machine!
- If you don't have a vanishing ink fabric marker then print or draw your design and pin the paper to your felt. I did it this way when I made my felt marbles maze and it worked out great!
- I'm thinking this would make a cute phone or kindle cover too.
- You could always buy a hard cover one if you're not a sewer. :)


Tuesday, 30 October 2012

Hot Water Bottle Heat Pack Tutorial

Microwavable Hot Water Bottle Heat Pack


I'm trying to think up some ideas for Christmas presents that I can get started on and I came across lots of cute heat packs on Pinterest. I was torn between making one of those and making a hot water bottle cover when I realised I could just combine the two! :) Just fill the little hot water bottle with rice and a few drops of lavender oil and you have a microwavable hot water bottle!


Hot Water Bottle template - free download

First download my hot water bottle template here. This make quite a small hot water bottle but you could easily enlarge it.
(And if you like it and want to show your appreciation by clicking on a few ads I promise to keep supplying you with free stuff! :)


Print and cut two copies of the template in a cotton fabric.


Pin your two hot water bottles together (right sides facing if your fabric has a right and wrong side). Sew around the outside, leaving a small gap on the bottom edge so you can turn and fill it. I sewed a zig zag stitch around the outside afterwards just to make it extra secure. (Don't want any rice escaping!)


Mix some rice with a few drops of lavender oil and leave to dry. Then fill your hot water bottle with rice. Sew across the bottom to close it up.


Next I sewed a little cover for it. I kinda just figured this out as I went, using the original template as a rough guide. As you can see from the picture, just leave a few inches of extra fabric at the top. I cut along the fold.


Then sew it up in a similar manner to the soap pouch I made.


This is what the other side looks like, with the hot water bottle tucked safely inside.


Sew your own microwavable rice filled hot water bottle heat pack!


The finished product. :)

Things I've Learnt:
- I filled mine with rice as that's what I had in the cupboard but after trying it out a few times it doesn't really hold the heat that well. It's lovely and hot for about 10 minutes but it'd be nice if it lasted just a bit longer! I know you can use buckwheat and flax seed too so maybe they'd be better!
- This little guy is quite small so I might have to make a bigger one next time. You could easily enlarge the template though.
- Be careful when heating these in the microwave, nothing worse than smelling burnt rice instead of lavender! They're pretty small so 1 minute to 1 and a half minutes max! It's a good idea to watch it and turn and shake it half way through.

*Thanks to Melanie @ My Mulberry Junction for her comment - dent corn might be a better option than rice to keep the heat a bit longer! :) And to Jessi @ Practically Functional who suggested using lentils instead! I think I'll just have to make another one to test it out! Oh and thanks Fran for her tip about putting a cup of water in the microwave with the heat pack to keep the rice from drying out/burning!


                                                                  Photobucket


Linked up to - Be ColorfulMaking the World CuterThe Girl CreativeSew Can DoCreating my way to SucessMy Fave FindsSewing BarefootMorsels of LifeToday's CreativeThe Creative ItchSewlicious DecorSugar Bee CraftsFunky Polka Dot GiraffeHope StudiosHomeworkLadybug BlessingsNew NostalgiaDIY DreamerSomeday CraftsSugar and DotsThe Trendy TreehouseSemi Homemade MomSeven Thirty ThreeLil LunaMichelle's Tasty CreationsFireflies and JellybeansThe Crafty Blog StalkerOne Artsy Mama

LinkWithin

Related Posts Plugin for WordPress, Blogger...