Showing posts with label gifts. Show all posts

Thursday, 13 December 2012

Princess Super Hero Cape

Princess Super Hero Cape and Mask - Being Inspired

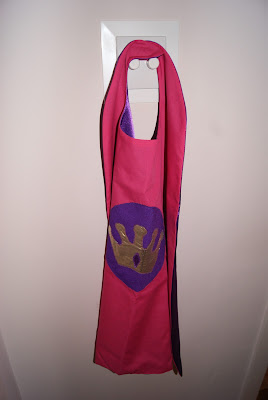
I'm trying to make as many of my Christmas presents as possible this year but I can't share many of them yet as their recipients might see them! But I'm pretty sure the little girl who's getting this Princess Super Hero Cape doesn't read my blog. :) So I thought I'd share some pictures of it.

There are loads of great tutorials for making capes so I'm not going to do a full tutorial but these are the blogs that inspired mine: I used the patterns from Serving Pink Lemonade for the top of the cape and the princess crown and Living Locurto for the eye mask. And I got the dimensions for my cape from How Does She

Princess Crown pattern

Once you've cut out your pieces sew your logo onto the center. My cape is purple on one side with a SuperGirl T logo (the little princess' name begins with T) and pink with a princess crown on the other side. I had found gorgeous gold fabric to use but it frays really easily so in retrospect it wasn't the best choice. I ended up using a zig-zag stitch around the outside so hopefully that'll keep it secure but use felt if you can, much less hassle!


Then just pin the pieces right sides together and sew around the outside. Don't forget to leave a gap so you can turn it.


It's a good idea to cut into the excess around the collar so it doesn't pucker so much. Then just turn it the right way out, press it and sew up the gap using a ladder stitch.

Purple Princess Super Hero Cape

This is purple side of the cape (which needs to be ironed!). I also made a Princess Super Hero mask to match, pink on one side and purple on the other. You could also make super hero cuffs but this costume is more Princess than Super Hero so I might add a crown or wand, we'll see!

Pink Princess Super Hero Cape


I'll make sure to update this after Christmas with pictures of it in action but until then this little cape is just hanging out, waiting to be worn!

Things I've Learnt:
- It was a little tricky working out what size to make it as I can't measure the little princess! But I'm hoping it'll be okay and I put a large piece of velcro on the neck so it'll be easy to adjust it. 
- You could attach the velcro before sewing the two pieces together but it felt it would be a bit more secure to do it afterwards, just use co ordinating thread to keep it looking pretty!
- I had a huge disaster when I was cutting out the purple fabric. I had it folded in half and traced the template for the collar on the wrong side!! So when I opened it out the collar pieces went the wrong way! :( I tried to patchwork fix it but ended up buying more fabric, it is a Christmas present after all! But just make sure you double check before you cut!!
- You obviously could make this in black and red for a Batman and Superman cape if Princesses aren't your thing. :) Next time I have some free time I'm going to make a set for my classroom role-play area!

Oh and be sure to enter my Giveaway to win two cute sock monkeys and lots of teaching resources!


Thursday, 15 November 2012

Homemade Glitter Name Crayons

Homemade Glitter Name Crayons


So it's all go on the Christmas present production front here. Next up - homemade glitter name crayons! :) I first saw and pinned this idea almost a year ago - re-use old crayons to make cute little heart shaped crayons! I'll probably still do this for my class for Valentine's Day but hearts aren't very Christmas-y and it's been too long since I last melted something so decided to make these cute glitter name crayons instead!

They're so easy to make, especially if you can rope in some little helpers to peel the paper off the crayons! Here's how you do it:

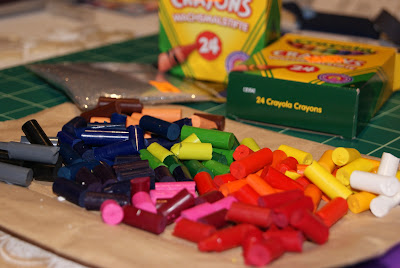
Broken crayons all set for melting!

First peel the paper off your crayons, break them into little pieces and sort them by into colour groups. It's up to you how many different colours you want in each crayon but be careful not to let them mix together too much when they're melted unless you want a whole bunch of brown crayons! 


A craft knife will make the annoying job of peeling so much easier! :) Failing that, pop them in a  basin of warm water for 10 minutes.


Next grab some alphabet ice cube trays. I searched for weeks for these but ended up buying them on amazon. These are the ones I bought. They're freezer and oven safe so perfect for this!

Melted crayon letters

Pour a little glitter into the bottom of the ice cube tray and roll your little crayon bits in more glitter. Then slot them into the letter spaces. 


Put them on a tray and pop them into the oven. It's a good idea to cover your tray in tinfoil in case you get any spillages, I can't imagine cleaning crayon out of the oven is much fun! 

I had them in on a low heat (about 140° C) for about 5 - 10 minutes. But just keep an eye on them and keep checking them. Make sure they're fully melted and then take them out of the oven to cool. Be careful moving the tray, the more you shake them the more the colours will mix.


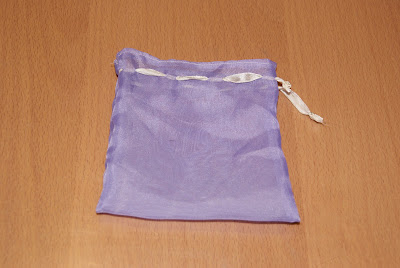
While I was waiting for them to cool I sewed some little bags to keep the crayons in. :)


Then pop them out of their trays and into their little bags! 


They actually come out quite easily, I didn't have one broken crayon. Although I suppose if they do break you know exactly how to fix that! :)

Homemade glitter alphabet crayons

The letters can of course also be used to make lots of other words and are great for some tactile letter exploration. Next I'm going to make a full alphabet set for school. If I can bring myself to peel more crayons that is... :)


Things I've Learnt:
- As ever when crayons are concerned it's worth paying the little extra for good quality ones! At a push I'd mix in a few old cheap ones with the Crayola ones.
- Peeling the paper off is definitely the most time consuming part of making these. So either soak them in warm water first or use a craft knife to slice the paper wrapper open.
- I wish I'd added a bit more glitter but I only had glitter in a bag and it was so messy!! Next time I'll get a little tube and sprinkle some more in. Cos really you can never have too much glitter in life. :)
- Use a toothpick to swirl the melted crayons if you want the colours to marble a little or mix completely. I didn't touch most of mine (bar the light blue one) as I wanted the colours to stay a little distinct.


Tuesday, 30 October 2012

Hot Water Bottle Heat Pack Tutorial

Microwavable Hot Water Bottle Heat Pack


I'm trying to think up some ideas for Christmas presents that I can get started on and I came across lots of cute heat packs on Pinterest. I was torn between making one of those and making a hot water bottle cover when I realised I could just combine the two! :) Just fill the little hot water bottle with rice and a few drops of lavender oil and you have a microwavable hot water bottle!


Hot Water Bottle template - free download

First download my hot water bottle template here. This make quite a small hot water bottle but you could easily enlarge it.
(And if you like it and want to show your appreciation by clicking on a few ads I promise to keep supplying you with free stuff! :)


Print and cut two copies of the template in a cotton fabric.


Pin your two hot water bottles together (right sides facing if your fabric has a right and wrong side). Sew around the outside, leaving a small gap on the bottom edge so you can turn and fill it. I sewed a zig zag stitch around the outside afterwards just to make it extra secure. (Don't want any rice escaping!)


Mix some rice with a few drops of lavender oil and leave to dry. Then fill your hot water bottle with rice. Sew across the bottom to close it up.


Next I sewed a little cover for it. I kinda just figured this out as I went, using the original template as a rough guide. As you can see from the picture, just leave a few inches of extra fabric at the top. I cut along the fold.


Then sew it up in a similar manner to the soap pouch I made.


This is what the other side looks like, with the hot water bottle tucked safely inside.


Sew your own microwavable rice filled hot water bottle heat pack!


The finished product. :)

Things I've Learnt:
- I filled mine with rice as that's what I had in the cupboard but after trying it out a few times it doesn't really hold the heat that well. It's lovely and hot for about 10 minutes but it'd be nice if it lasted just a bit longer! I know you can use buckwheat and flax seed too so maybe they'd be better!
- This little guy is quite small so I might have to make a bigger one next time. You could easily enlarge the template though.
- Be careful when heating these in the microwave, nothing worse than smelling burnt rice instead of lavender! They're pretty small so 1 minute to 1 and a half minutes max! It's a good idea to watch it and turn and shake it half way through.

*Thanks to Melanie @ My Mulberry Junction for her comment - dent corn might be a better option than rice to keep the heat a bit longer! :) And to Jessi @ Practically Functional who suggested using lentils instead! I think I'll just have to make another one to test it out! Oh and thanks Fran for her tip about putting a cup of water in the microwave with the heat pack to keep the rice from drying out/burning!


                                                                  Photobucket


Linked up to - Be ColorfulMaking the World CuterThe Girl CreativeSew Can DoCreating my way to SucessMy Fave FindsSewing BarefootMorsels of LifeToday's CreativeThe Creative ItchSewlicious DecorSugar Bee CraftsFunky Polka Dot GiraffeHope StudiosHomeworkLadybug BlessingsNew NostalgiaDIY DreamerSomeday CraftsSugar and DotsThe Trendy TreehouseSemi Homemade MomSeven Thirty ThreeLil LunaMichelle's Tasty CreationsFireflies and JellybeansThe Crafty Blog StalkerOne Artsy Mama

Tuesday, 2 October 2012

Day 29 - Soap Pouch

Here's a quick and easy little sewing project inspired by Whimsy Love - a little pouch for your soap! Pop your soap inside, scrub away and throw it in the washing machine to clean it! It even has a little ribbon loop so you can hang it up to dry in the shower. And the best part of all? It's so easy to make!

 Wanna make some of your own? 


All you need is a face cloth (or hand towel), some ribbon and a bar of soap. Cut  a rectangle out of your face cloth about 4" by 11.5". Depending on the size of your soap you might need to play about with this a little, try 4.5" width if you want a little wriggle room!


Pin a piece of ribbon to one end of your rectangle. The nice thing about using a face cloth is that its the perfect length so there's no raw edges at the ends. If you cut yours from a bigger towel then just fold down the raw edge twice and sew across it. (Don't worry about the raw edge on the long side, it'll be hidden inside!)


Lay out your material with the ribbon end face up at the bottom.


Fold the bottom up to about 3.5". Cut another piece of ribbon and fold it in half. Place the loop just above the fold in your material. Make sure there's a little bit sticking out at the side!


Fold the top down so that the pouch measures about 4.5" - 5". This was the first one I made and the fold actually comes down a bit too far so try and have it a little bit closer to the middle so you can get your soap in!

Sew along the two long sides (where the pins are). 


Turn your little pouch the right way out and pop the soap inside! 


Now go make some more so you have one for every day of the week! Or colour coded ones for different family members. Or make two and tie them with a ribbon to give as a gift. :)


Things I've learnt:
- Soaps come in many different sizes, play about with the measurements (or seek out some smaller soaps!) if yours doesn't fit first time.
- It's definitely easier to use a face cloth, less raw edges to work with!
- You know the ribbons on tops and dresses that are used to keep them on the hanger in the shop but are really annoying when you're actually wearing the clothes? Start hoarding them, they're perfect for this project!

                                                                   
No time to make some? You can always buy some online! Embroider the recipients name on it and it'll still make a cute thoughtful gift. :)


Wednesday, 12 September 2012

Day 19 - Balloon Parcels!

Balloon Parcels!
Remember the Princess Finger Puppets that I made a week or so ago? Well they've been featured on "Sew Cute Tuesday" @ The Creative Itch. Which means I get my first featured on button!! :) So once I finally pick my new blog design I've another page to add to display my button!

Photobucket
Now with added Rapunzel!


This also reminded me that I hadn't actually got around to sending these puppets to their new home! I remember being a kid and always being so jealous of all the post that my parents got (if only I had known that most of those were bills!). So rather than give my cousin's their presents in person I thought it'd be fun to post them. 


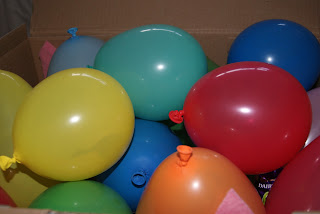
I had seen a great idea on pinterest (from She's Crafty) for sending kids money on their birthdays. You put the money inside balloons, inflate them and send the child a box of money filled balloons! So I decided to put my little puppets and some sweets into balloons for the girls!


 It was a bit tricky getting them into the balloons at first but in the end I just stretched them as much as I could, folded up the finger puppets and squashed them inside. Once I blew up the balloons they popped out into their normal shape (and no-one lost an eye!)


The finished box! What kid wouldn't love to receive this in the post!! :)

Things I've Learnt:
- Putting lollipops inside balloons is not such a good idea... unless you like the sound of balloons bursting!


LinkWithin

Related Posts Plugin for WordPress, Blogger...